
How to Grill Burgers: A Beginner’s Guide
Grilling the perfect burger is an art form that can turn any backyard gathering into a memorable event. Whether you’re a seasoned grill master or a novice looking to impress, understanding the basics of how to grill burgers is your ticket to achieving that juicy, flavorful patty we all crave. So, grab your spatula, and let’s dive into the world of burger grilling with a sprinkle of humor, because let’s face it, even the most serious burger can benefit from a little light-heartedness.
Basic Preparations for Grilling Burgers
Choosing the Right Meat
The quest for the ultimate grilled burger begins with selecting the perfect blend of ground meat. A 20% fat content in ground beef strikes the ideal balance between flavor and juiciness, transforming a simple patty into a delectable feast. However, the choice of meat blend can elevate your burger from merely good to gourmet.
For those looking to experiment, a blend of chuck, brisket, and short rib offers a combination of flavors and textures that can make your burgers the talk of the town. Chuck provides a beefy base, brisket introduces a rich flavor, and short rib adds an unparalleled juiciness. This trio is often touted by chefs and burger aficionados alike for creating a complex, mouthwatering patty.
Yet, the exploration doesn’t stop there. Adventurous grillers might consider incorporating a bit of ground pork or lamb for an unexpected twist. Each meat brings its own unique flavor profile to the table, inviting a creative culinary experiment with every grill session. Remember, the quality of meat greatly influences the final product, so opt for the best your budget allows.
Shaping Your Burgers
When shaping your burgers, think of yourself as a burger whisperer—gentle yet firm. Aim for patties that are about ¾ inch thick; this ensures a nice, even cook without turning them into hockey pucks. And remember, thumbprint in the middle! This little indent keeps your burgers from puffing up into meatballs.
Using Pre-Formed Frozen Patties
For those times when convenience wins, using pre-formed frozen patties doesn’t mean sacrificing quality. To grill frozen patties properly, start with a preheated grill and place the frozen burgers directly on the grates. The key is to extend the cooking time slightly compared to fresh patties, accounting for the thawing process as they cook. Grill each side for about 4-6 minutes, checking for doneness. This approach ensures even cooking and a satisfying texture, making pre-formed frozen patties a viable option for quick, delicious burgers.
Preheating the Grill
Preheating the grill is akin to prepping your canvas before painting; it sets the stage for your culinary creation. A grill that’s heated to a medium-high temperature ensures your burgers cook evenly, achieving that crave-worthy sear without sticking to the grates. Think of preheating as the warm-up before the main event; it’s essential for performance.
Allow your grill to reach the optimal temperature—around 375-400°F—for direct grilling burgers. This heat level is perfect for cooking the patties thoroughly while also imparting those iconic grill marks that are not just visually appealing but add a subtle smoky flavor. Patience during preheating can make all the difference between a good burger and a great one.
How to Grill Burgers: A Step-by-Step Guide
Seasoning Your Burgers
Seasoning is not just crucial; it’s the soul of your burger. A generous sprinkle of salt and pepper just before the burgers hit the grill doesn’t just add flavor; it transforms your patty from ordinary to extraordinary. Think of the seasoning as the final pep talk before the burgers take the stage, setting them up for a performance that’s bound to earn a standing ovation. But don’t stop at salt and pepper. Depending on your taste, a pinch of garlic powder, onion powder, or even a hint of smoked paprika can add an interesting twist to your burger, making each bite a discovery of flavors.
The timing of seasoning is as important as the seasoning itself. Adding salt too early can draw moisture out of the beef, leading to a drier burger. By seasoning right before grilling, you ensure the meat retains its moisture, resulting in a juicy, flavorful burger that glistens with each bite. It’s about creating a balance, where each granule of seasoning plays its part without overshadowing the rich, beefy taste of the patty.
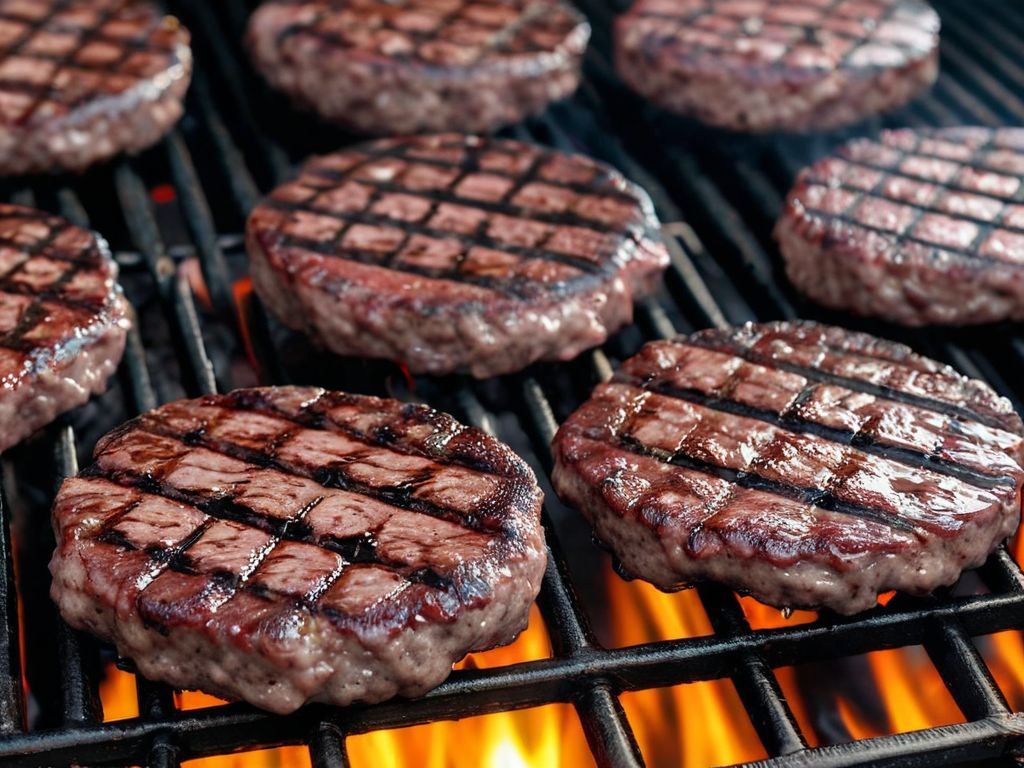
The Perfect Placement on the Grill
Finding the right spot on the grill for your burgers is like finding the sweet spot in a hot tub. It needs to be hot enough to cook the burger thoroughly but not so hot that it chars the outside while leaving the inside undercooked. Medium-hot zones offer the perfect middle ground, allowing the patties to cook evenly, developing a rich, golden-brown crust that’s the hallmark of a great grilled burger.
Consider the layout of your grill. Most grills have hotter and cooler zones, usually hotter towards the back and cooler at the front. Place your burgers on the grill so that they’re exposed to consistent heat, ensuring an even cook. If flare-ups occur—a common scenario when fat drips onto the flames—be prepared to move your burgers to a cooler part of the grill to avoid charring. It’s this dance, moving burgers between zones, that often defines the grilling experience, ensuring each patty is cooked to perfection with just the right amount of smoky flavor.
The Ideal Number of Times to Flip the Burger
The debate over the ideal number of times to flip a burger is a contentious one, with traditional wisdom often advocating for flipping only once to preserve the burger’s juiciness and ensure even cooking. However, recent culinary explorations suggest that flipping a burger multiple times can also yield excellent results, especially if you’re aiming for an even crust and consistent doneness throughout the patty.
The One and Done
Flipping your burger only once during cooking has its merits, primarily focusing on allowing each side of the burger to develop a deep, caramelized crust. This method is straightforward and often recommended for beginners as it simplifies the grilling process. By letting the burger sit undisturbed on the grill, you allow the heat to penetrate the meat evenly, creating a succulent interior and a flavorful exterior. It’s akin to allowing a story to unfold naturally, giving each side the time it needs to fully express its character.
Multi-Flipper
On the other hand, flipping burgers multiple times—every minute or so—can also produce burgers that are cooked evenly throughout, with less risk of overcooking the exterior before the interior reaches the desired doneness. This technique, often backed by food scientists, suggests that more frequent flips can lead to a burger that cooks faster and more uniformly, as the constant movement distributes heat more evenly across the patty. Think of it as stirring a pot to keep the contents from sticking; by frequently flipping, you’re ensuring that the burger cooks evenly on all sides.
The key to successful multi-flip grilling is attention and timing. Each flip is an opportunity to check the burger’s progress, making adjustments to the heat or grill placement as needed. This method requires a more active grilling style but can lead to juicier, evenly cooked burgers that are less likely to be charred on the outside while still raw in the center.
Ultimately, whether you choose to flip your burger once or multiple times comes down to personal preference and the specific conditions of your grill. Experimenting with both methods can help you discover which technique works best for you, allowing you to achieve your ideal burger. Remember, the goal is to create a delicious, juicy burger, and both flipping strategies have their place in the burger grilling arsenal.
Mastering the Sear: Tips for a Perfect Burger
High Heat and Timing
High heat is crucial for achieving that perfect sear, locking in flavors and juices. For medium-rare burgers, aim for about 3-4 minutes per side. However, if you’re aiming for medium, cook each side for 4-5 minutes; for well-done, extend the time to about 6-7 minutes per side. This guideline helps ensure each burger reaches its ideal doneness, catering to all preferences at your table.
Using high heat for the initial sear then moving the burgers to a cooler part of the grill to finish cooking is a technique worth mastering. It allows the burger’s exterior to develop that coveted crust while the inside cooks to perfection without drying out.
The Touch Test for Doneness
Forget fancy gadgets; your hands are one of the best tools. Press the center of the burger lightly; if it springs back, it’s done. If it feels soft, it needs more time. Think of it as the burger’s way of saying, “I’m ready” or “Give me a minute.”
Common Mistakes in Grilling Burgers and How to Avoid Them
Grilling burgers seems straightforward, but a few common slip-ups can turn your feast into a flop. Here’s a quick rundown:
- Overhandling the Meat: The more you work it, the tougher your burger becomes. Handle the ground beef as little as possible for the best texture.
- Ignoring Internal Temperature: A meat thermometer isn’t just for turkey day. For medium-rare, aim for 130-135°F; for medium, 140-145°F.
- Forgetting to Rest: Just like us after a long day, burgers need a moment to rest. Let them sit for a few minutes before serving to let the juices redistribute.
To learn more, check out our article talking about the 7 top mistakes made when grilling burgers, where we’ll dive deeper into these and other mistakes.
The Finishing Touches: Serving Your Grilled Burgers
Resting the Burgers
After grilling, give your burgers a brief rest. This pause allows the juices to redistribute throughout the patty, ensuring every bite is as juicy as the first. Think of it as the burger taking a deep breath before its big moment on your plate.
Choosing the Right Bun and Toppings
The bun is the unsung hero of the burger; it brings all elements together. A soft, lightly toasted brioche bun offers a subtle sweetness and a buttery texture that complements the richness of the meat. Alternatively, a sturdy sesame seed bun provides a nice crunch and holds up well under the weight of the burger and toppings.
When it comes to toppings, the sky’s the limit. Classic options like crisp lettuce, ripe tomatoes, and thinly sliced onions offer freshness and contrast. For those looking to elevate their burger, consider gourmet toppings like caramelized onions, sautéed mushrooms, or a slice of avocado for a creamy texture. Cheeses like sharp cheddar, gouda, or blue cheese can add a depth of flavor that turns a simple burger into a culinary masterpiece.
The right combination of bun and toppings can transform your grilled burger into a tailor-made delight. Experiment with different textures and flavors to find your perfect match, creating a burger that’s uniquely yours.
Parting Bites: Key Takeaways on How to Grill Burgers
Grilling the perfect burger is more of an art than a science, blending skill, creativity, and a dash of patience. As we’ve journeyed through the essential steps—from selecting the juiciest cuts of meat to achieving that mouth-watering sear—it’s clear that each burger offers a canvas to showcase your culinary flair. With your grill as your palette and these key takeaways in hand, you’re well-equipped to turn every barbecue into an exhibition of flavor and finesse.
Remember, the path to burger brilliance is paved with experimentation. Don’t shy away from trying different meat blends, seasonings, and grilling techniques. The quintessence of grilling burgers lies not just in the methods but in the moments shared around the flames. So, gather your friends and family, ignite your grill, and embrace the joy of cooking together. The best burgers, after all, are those seasoned with laughter, shared with companions, and savored in good company. Here’s to many memorable meals and mastering the art of how to grill burgers. Happy grilling!